Oatmeal Raisin Cookies (2015 Bucket List- #3.1)

One of my bucket list items/goals this year is to try to bake a variety of different cookies. The first cookies I’ve baked this year are these oatmeal raisin cookies. I got the recipe out of Pillsbury’s Best Cookies Cookbook (page 45, for those interested).

Ingredients-

  • 3/4 cup sugar
  • 1/4 cup firmly packed brown sugar
  • 1/2 cup margarine or butter, softened
  • 1/2 teaspoon vanilla
  • 1 egg
  • 3/4 cup all-purpose flour
  • 1/2 teaspoon baking soda
  • 1/2 teaspoon cinnamon
  • 1/4 teaspoon salt
  • 1 1/2 cups quick-cooking rolled oats (I used old fashioned- they were a suggested substitute for chewier cookies)
  • 1/2 cup raisins (I used more; I like lots of raisins)
  • 1/2 cup chopped nuts (I didn’t use any because of orthodontic treatment in my family)

Steps-

1. Heat oven to 375 degrees F. (It was actually really cool how the oven finished preheating right as I finished mixing the dough). Grease cookie sheets (yes, definitely do this…and with a lot of oil, don’t just use the butter wrapper). In large bowl, combine sugar, brown sugar, and margarine; beat until light and fluffy. Add vanilla and egg; blend well. Add flour, baking soda, cinnamon and salt; mix well. Stir in oats, raisins and nuts. Drop dough by rounded teaspoonfuls 2 inches apart onto greased cookie sheets.

Bake at 375 degrees F for 7 to 10 minutes (it takes closer to 10) or until the edges are light golden brown. Cool 1 minute; remove from cookie sheets.

My cookies turned out quite flat….but then I remembered that I was going to put in 1/4 cup whole wheat flour and 1/2 cup of all-purpose flour instead of 3/4 cup all-purpose flour…and I forgot to put in the 1/4 cup whole wheat flour.

The cookies were really good, but a tad sweet (maybe also because I forgot to put in enough flour?) The recipe made about 2 dozen cookies plus a super-sized cookie (which I made because I was too lazy to make little pieces of dough).

All in all, I think it is a wonderful recipe. If I make it again, I’m going to use less sugar and use the right amount of flour. ☺ I might even use it for a cookie basket item in the county fair, which is coming up!

Screenshot (25)

Pirouette Hat (2015 Bucket List- #2)

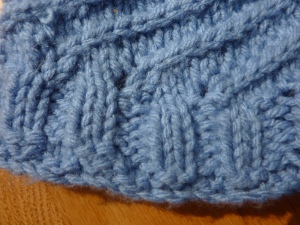
After many, many failed attempts to start this hat, I finally managed to start (and finish!!) this really cute Pirouette Hat, courtesy of Little Theorem. The main reason this project was hard was because I had never tried knitting on double pointed needles before, which cause quite a few stitches dropped off the “wrong” end of the DPN. Overall, the entire pattern was quite easy to follow and very specific. The hat was 2×2 ribbing followed by a “twisty” pattern of k3, k2tog, yo, decreasing stitches close to the top.

Featured image
A close up of the ribbing/twisty pattern

At a few places in the pattern I still did drop stitches and had to either create stitches (I know…you aren’t supposed to do that) or try to pick up stitches, both of which showed up very prominently in the final product. (I also should learn/practice picking up dropped stitches…)

Featured image
The outside of the hat
Featured image
The inside of the hat

I finished this hat in about a month (during the school year!), once I actually decided I would finish it. I cast on in the car on a long car ride and finished it this past weekend, right after school ended. It is very repetitive for the first seven inches of the pattern, so I did most of it while either watching television or reading, because I didn’t have to look at what I was doing.

This hat was for the HabitRPG challenge “Craft Ahead”, for a knitting or crocheting project that had to be started at least 2 months before it was needed. I made my hat for the county fair, happening in August. Other than that, I’m still not sure where I will actually use it (e.g. birthday/Christmas presents), since the mistakes are somewhat obvious. It also fulfills my need to make a “hat, or pair of socks/mittens” for my 2015 Bucket List.

I think it is an adorable pattern; however, it is very small.  cannot fit into it; I would give it to about a 5-8 year old. Perhaps, by adding 27 more stitches (the pattern even disperses 81 stitches across 3 DPNs- 27 would add another needle’s worth of stitches…is that even possible?) the pattern would be able to fit an adult.

English Muffin Bread

Well…I haven’t posted anything for 3 weeks, but never late than never!

Today, I attended a baking class at my brother’s art teacher’s house. We baked English muffin bread and learned about sourdough starters.

Here is the recipe for the English muffin bread.

Ingredients:

  • 11 cups of flour
  • 4 tablespoons of yeast
  • 3 1/2 teaspoons of table salt
  • 1/2 teaspoon baking powder
  • 1 cup powdered milk

Directions:

  1. Mix ingredients
  2. Add 6 to 7 cups of warm water, and stir until mixed. The batter will appear very goopy.
  3. Butter and dust 4 loaf pans with cornmeal.
  4. Place in a warm area for 30 to 45 minutes or until the bread has doubled.
  5. Bake at 425 degrees for 15-20 minutes. (This makes the center of the loaf very soft and doughy- you might want to bake 5-10 minutes longer unless you like soft, doughy bread).

This recipe makes 4 loaves of english muffin bread. Since the teacher does have 5 kids, halving the recipe might be a good idea. 😀

The teacher took this recipe and modified it-

http://www.restlesschipotle.com/2009/05/english-muffin-bread/

After the baking class, we came straight home and baked bread (and yey to messy counters and bad lighting)-

We used this other English Muffin Bread recipe because we didn’t have powdered milk (note this recipe is halved).

Ingredients:

  • 5 1/2 cups flour
  • 2 T dry yeast
  • 1 T honey
  • 1/4 cup warm water
  • 2 t kosher salt
  • 1/4 t baking powder
  • 2 1/4 cups warm milk
  • Butter and cornmeal for greasing and dusting the pans

Directions:

  1. Mix the yeast, honey, and water. Set aside.
  2. Sift the salt, baking powder, and flour.
  3. Add the milk and one cup of the flour to the yeast mixture.
  4. Blend well.
  5. Add the remaining flour and beat.
  6. You should have a very soft, goopy dough. Yes. I said goopy.
  7. Spoon the dough into 2 loaf pans that have been greased and dusted with cornmeal.
  8. Set aside in a warm place until the batter has doubled and is at the top of the pans, or a little above. This may take 30 to 45 minutes.
  9. Preheat the oven to 425F
  10. Dust the tops of the loaves with cornmeal and bake for 15 minutes or so. The Loaf will sound hollow when tapped.
  11. Bake for 20-25 minutes if you want a crisper, more golden crust.
  12. Cool and slice.

This bread is very good toasted (as to get rid of the doughy center) and spread with butter.

Blueberry Pie (2015 Bucket List- #1)

Yesterday, when my mom and my brothers were at AWANA (a Bible club at our church), and dad was at work, I decided that I would tackle one of the items on my 2015 bucket list.

I got the Idea to bake a pie from Elizabeth Enright’s Gone Away Lake. In the book, all Foster wants for lunch is pie. I decided that I wanted to bake a pie. (Of course, now that I’m typing this up, I realize that baking a pie might have been a better idea for March, for Pi day….but oh well).

For the pie crust, I used this recipe:

Pie Crust

  • 8 oz. (1 cup) cream cheese at room temperature
  • 8 oz (1 cup) butter at room temperature
  • 2 cups flour
  • 1/2 teaspoon salt

Mix all ingredients together. Refrigerate 2-24 hours before rolling out the dough. Keep edges covered with foil while baking, except for the last 10 minutes.

For the filling, I used this recipe:

Wild Berry Pie Filling

  • 2 cups mashed berries (I used frozen blueberries)
  • 3/4 cup honey (you may not want to use this much- it’s really sweet, especially with blueberries. If you’re doing other, more sour berries, then yeah, this amount is good)
  • 1/2 tsp cinnamon
  • 1/4 tsp nutmeg
  • 1 T fresh lemon juice
  • 2 T cornstarch
  • 2 T tapioca flour
  • 2 T arrowroot flour
  • 4 T cold water
  • 2 T water

Slowly hear mashed berries with 2 tablespoons of water. Stir to avoid sticking. When the mixture is boiling, add honey, spices, and lemon juice. In a separate cup, mix 4 tablespoons of cold water with cornstarch, tapioca, and arrowroot powder to form an even milky solution with no lumps. Add this milky solution to slowly boiling berry mixture while stirring evenly. Remove from heat and pour into baked pie crust. Add fresh sliced or whole berries on top of pie filling. Cool pie and serve with natural whipped cream. Cover and store in refrigerator.

The “cool pie” part is very important- I was too impatient and cut it before it was cool enough. The crust was too soft and gave way. Other edits to the recipe- we didn’t have any tapioca flour or arrowroot flour, so I used 4 total tablespoons of cornstarch (in place of the cornstarch, tapioca flour, and arrowroot flour). I used whole wheat flour in the pie crust, to make it healthier.

Peppermint Bark (2014 holiday recipe)

A few weeks ago, a couple of my friends were making peppermint bark. Because I still hadn’t decided on my 2014 holiday recipe yet, I decided that I’d like to try making peppermint bark too!

Here is the recipe that I used:

Ingredients:

  • 30 crushed peppermint hard candies, divided
  • 1 1/2 pounds milk chocolate candy, coarsely chopped
  • 1 1/2 pounds white chocolate, chopped
  • 1 teaspoon oil-based peppermint flavoring, or to taste

Directions:

  1. Spread 1/3 of the peppermint candy over a 9×13-inch baking pan lined with wax paper.
  2. Melt the milk chocolate in the top of a double boiler over just-barely simmering water, stirring frequently and scraping down the sides with a rubber spatula to avoid scorching, just until melted. Pour the melted chocolate over peppermint candy in the prepared pan. Sprinkle another 1/3 of the candy on top of the milk chocolate. Refrigerate until the chocolate hardens, about 30 minutes.
  3. Melt the white chocolate in the top of a double boiler over just-barely simmering water, stirring frequently and scraping down the sides with a rubber spatula to avoid scorching. Stir in the oil-based peppermint flavoring. Pour the white chocolate over the milk chocolate, then spread the remaining 1/3 peppermint candy on top.
  4. Refrigerate until the white chocolate hardens, about 30 minutes. Cut or break into pieces to serve.

As it turned out, I didn’t find a pan quite big enough . . . and as a result, my peppermint bark was wayyyy too thick. I ended up with a pan of peppermint bark about 1 1/2 inches thick, so if you decide to make it, make sure you find a pan where you can spread out the chocolate thinly and evenly!

Overall, it is really good (if difficult to eat), and I would definitely recommend making some! The recipe wasn’t too difficult to work with, and the results are really good!